Jesus Saves is a save-game persistence framework for Unreal Engine 5, written in C++ with extensive Blueprint exposure. It lets you quickly add saving and loading to a project, helping you to persist player pawns along with spawned and placed level actors. Jesus Saves includes a built in auto-save system and a save game slot management suitable for both fixed slot and per playthough profiles.
This document walks through implementing the save feature from scratch in Blueprint, then documents how each of the plugin's 17 classes is used. Most classes appear in the walkthrough; the remainder are covered in the Class Reference Appendix.
All examples are Blueprint-only. No C++ is required to use the plugin.
Contents
- Installation
- Required Engine Plugins
- How the Pieces Fit Together
- Step-by-Step Walkthrough
- 4.1 Choose Your Save Game Class
- 4.2 Build a Save / Reload Test Key
- 4.3 Persist the Player Pawn
- 4.4 Save Your Own Variables
- 4.5 Persist a Placed Physics Actor
- 4.6 Custom Save Logic With the Notification Interface
- 4.7 Persistent Destruction
- 4.8 Profiles, Slots & Autosave for Shipping
- 4.9 Building the Continue / Save / Load Menus
- Class Reference Appendix
- Troubleshooting & Tips
- All 17 Classes at a Glance
1. Installation
- Install Jesus Saves from Fab into your Engine (or add it to your project's
Plugins/folder). - Open your project and go to Edit → Plugins.
- Search for Jesus Saves and enable it.
- Restart Unreal Engine when prompted.

Platform: the runtime module ships for Win64. The module loads at the
PreDefaultphase so the save-game subsystem is available very early in startup.
2. Required Engine Plugins
Jesus Saves depends on two engine plugins, which are declared as dependencies and will be enabled automatically when you enable Jesus Saves:
| Engine plugin | Why it is needed |
|---|---|
| OnlineSubsystem | Resolves the per-player online identity used to scope save slots to a user. |
| OnlineSubsystemUtils | Companion utilities for OnlineSubsystem. |
If you ever see save slots failing to resolve a user, confirm both plugins are enabled (Edit → Plugins → Online Platform). No further online configuration is required for single-player saving.
3. How the Pieces Fit Together
You do not need every class to start saving. The framework has four layers, and you adopt only as much as your game needs:
- The Subsystem —
UJSSaveGameSubsystemperforms the actual save and load. It is independent: you can drive it from this object alone, without the manager or helper. - Save Game Components — drop a component onto an Actor to make it persistent. There is a small hierarchy (basic → level actor → physics actor) so you add only the behavior you need.
- The Save Game object —
UJSSaveGameis the container your data is written into. The default works without any setup; subclass it only if you want save/load events at the game level. - Manager & Helper —
UJSSaveGameManagerandAJSSaveGameHelperadd profiles, slots, autosave, and quick save. These matter when you build a real save/load menu.
Each of these defaults can be replaced in Project Settings → Jesus Saves via
UJSDeveloperSettings with your own Blueprint subclass, without code.
4. Step-by-Step Walkthrough
The walkthrough builds up a working save system one actor at a time, using an Unreal first-person template project as the example.
4.1 Choose Your Save Game Class
Open Edit → Project Settings → Jesus Saves. Here you can assign the default classes the
plugin uses, all exposed by UJSDeveloperSettings:
- Save Game Class (
UJSSaveGame) — the container your data is serialized into. - Save Game Manager Class (
UJSSaveGameManager) — slot/profile bookkeeping. - Save Game Helper Class (
AJSSaveGameHelper) — autosave and quick-save driver. - Save Game World Proxy Class (
UJSSaveGameWorldProxy) — level-load behavior.
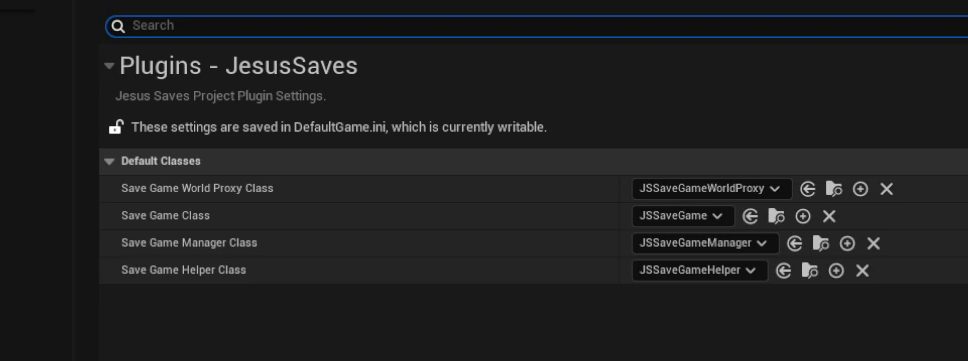
Leave all four at their defaults for a first pass. Override one only when you want custom behavior (Section 4.8 subclasses the Manager and Helper). These settings are restart-required, so restart the editor after changing them.
Subclassing
UJSSaveGamealso gives you four Blueprint events (Before Save Game / After Save Game / Before Load Game / After Load Game), useful for game-wide hooks such as writing a play-time counter right before a save.
4.2 Build a Save / Reload Test Key
First, build a key that saves and immediately reloads, so you can verify persistence as you go. Open the Level Blueprint (Toolbar dropdown → Open Level Blueprint) and build this graph:
- Add an input event for a test key. In-editor you can use a Debug Key (e.g.
T); a shipping game would use Enhanced Input. - Call Get Save Game Subsystem (from
UJSSaveGameFunctionLibrary) and an Is Valid check on the result. - Call Save Game As on the subsystem with a Slot Name of
QuickSave. - From the return value, add a Branch; on True, call Load Game with the same
slot name
QuickSave.
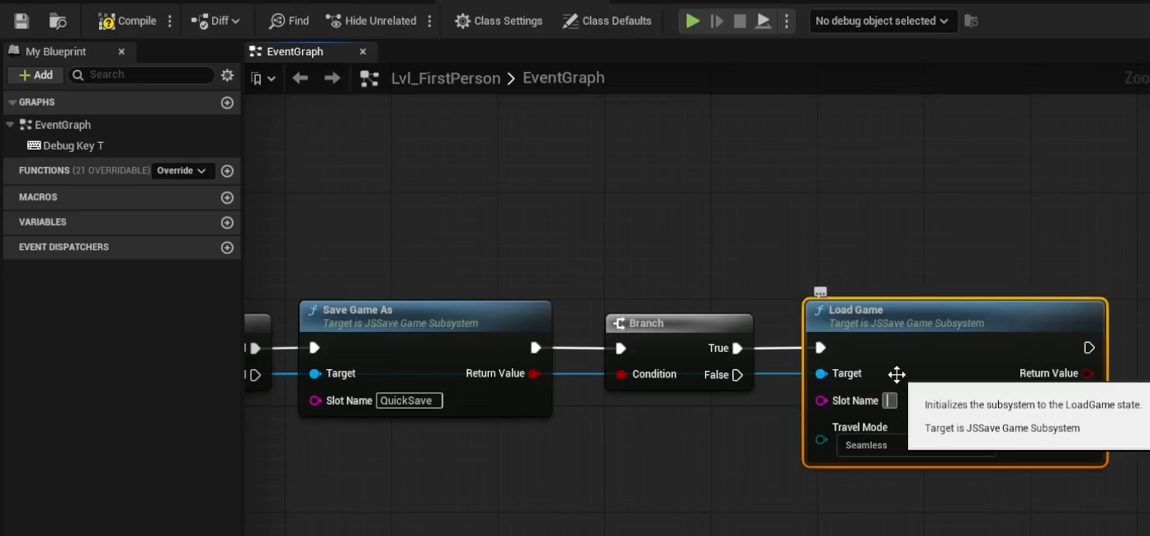
This exercises UJSSaveGameSubsystem directly. Saving and loading can be driven from the
subsystem alone, without the manager or helper:
SaveGameAs(WorldContext, SlotName)— writes the current game to a named slot. It may be called even when the subsystem is Uninitialized.LoadGame(WorldContext, SlotName, TravelMode)— loads a slot and travels to its level.NewGame(WorldContext)— initializes a fresh session. (Useful onBeginPlayif the subsystemStateisUninitialized, so editor play sessions start cleanly.)
Two common mistakes: 1. For a debug reload key, use the synchronous
Save Game As/Load Game, not theAsync…variants — you want the reload to be immediate and observable. 2. Save and load from the same slot name. A mismatched slot name is the most common cause of a reload that appears to do nothing.
Press Play, move and turn, then press your test key; the level reloads to the saved state. From here, anything that does not survive a reload still needs a save component.
4.3 Persist the Player Pawn
Open your character Blueprint (e.g. BP_FirstPersonCharacter), click Add Component, and add a JS Level Actor Save Game Component.
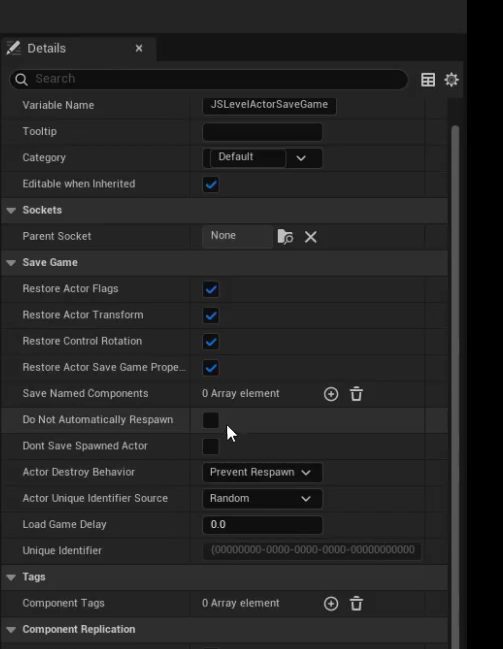
UJSLevelActorSaveGameComponent always saves the owning actor's transform,
visibility/collision flags, and the controller's control rotation. The bRestore*
flags control only whether each value is applied on load — they never affect what is written:
| Property | Effect on load (does not affect saving) |
|---|---|
bRestoreActorTransform |
Apply saved position, rotation, and scale on load. |
bRestoreActorFlags |
Apply saved visibility and collision flags on load. |
bRestoreControlRotation |
Apply saved controller aim on load (pawns). |
Important — restore flags never affect saving. The transform (and the other values) is written to every save regardless of these flags; they only decide whether it is read back. This protects forward-compatibility: if you ship your game with restore disabled and later decide you need it, the data is already present in players' existing save games, so turning the flag on works retroactively. Had the value been omitted from the save, it could never be recovered for saves made before the change.
For player pawns specifically, enable bDoNotAutomaticallyRespawn — Unreal already spawns
the player pawn for you, so you don't want the save system to respawn a duplicate.
Compile, then play and reload to confirm the character returns to its saved spot.
Multiplayer. Leave
LoadGameDelayat0for single-player. On a networked pawn, set a small value (e.g.0.03): a pawn'sBeginPlaycan fire before it has been possessed, and the short delay lets loading wait until possession completes so the saved transform and control rotation are applied to the right controller.
4.4 Save Your Own Variables
The save component does not save every variable automatically. It serializes only the
properties you mark with the SaveGame flag. A variable without the flag is ignored by the
save system; a flagged variable is written on every save and restored on every load.
Marking a variable as saved. Select the variable in your Blueprint, open its Details, expand the Advanced section, and enable Save Game.
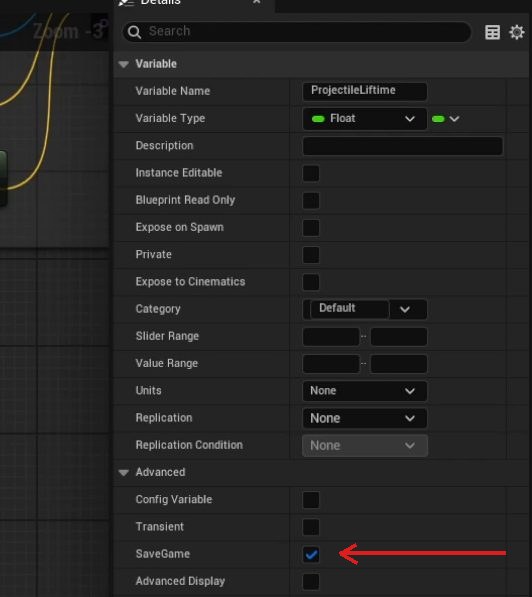
Actor or component — your choice. You can put SaveGame variables on the owning Actor
or directly on a custom save component. Actor variables are saved because
bRestoreActorSaveGameProperties on the component is on by default, so it just works.
If an actor has no save-worthy variables and you want to skip the work, disable that property.
What you can and can't save. The
SaveGameflag persists data, not references:
Type Saved? Bool, int, float, byte/enum, FString,FName,FText✅ Built-in structs ( FVector,FRotator,FTransform, …)✅ Arrays / Maps / Sets of the above ✅ Class references ( TSubclassOf, soft class)✅ Object / Actor references ( UObject*, an Actor, a component, soft object refs)❌ ignored, even when flagged Custom structs whose members are not themselves SaveGame❌ Object reference properties are dropped silently. In a development build the plugin logs an error like "Can't save object property X marked with Save Game." You cannot persist a pointer to another actor or asset directly. Instead, save something that identifies it (a
FName, an enum, a class —TSubclassOfis saved — or a GUID) and re-resolve the real object on load, a natural job for the Notification interface.For a custom struct, mark both the variable and each member you want kept with
SaveGame; built-in structs serialize whole automatically.The component hierarchy. When you add a save component you'll see a small tree: JS Save Game Component (base: serializes
SaveGameproperties and handles despawn) → JS Level Actor Save Game Component (adds transform/flags) → JS Physics Actor Save Game Component (adds velocities). Pick the lowest one that has what you need.UJSSaveGameComponentBasesits above all of them as an abstract base for writing fully custom components.
4.5 Persist a Placed Physics Actor
For an object that moves under physics (for example the static-mesh cube BP_ChamferCube):
- Create a Static Mesh Actor Blueprint and open it.
- Add Component → JS Physics Actor Save Game Component.
- Set the Static Mesh and material on the mesh component, and enable Simulate Physics.
- Compile, save, and drag the actor into the level.
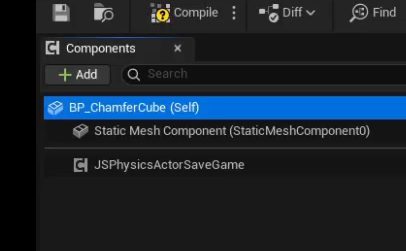
UJSPhysicsActorSaveGameComponent builds on the level-actor component and additionally
captures LinearVelocity and AngularVelocity, which are always restored on load, so a
tumbling object resumes its motion, not just its position. Move the cube, reload, and it stays
where you left it.
For simple persistent actors, adding the right component is all that is required.
Placed vs spawned actors. An actor placed in the level in the editor is restored automatically on load. An actor spawned at runtime is handled too: on save the plugin records the actor's class and respawns it for you when the game loads, so dynamically created objects are recreated on load. Two properties tune this: enable
bDoNotAutomaticallyRespawnfor actors that something else already recreates (the player pawn sets this automatically), orbDontSaveSpawnedActorto ignore a runtime-spawned actor entirely.
4.6 Custom Save Logic With the Notification Interface
Some state isn't a plain SaveGame variable. A common case is a projectile: its
motion lives on a Projectile Movement component (not the physics system), and its remaining
lifetime lives on the actor — neither is captured automatically. For cases like this, implement
the JS Save Game Notification interface (IJSSaveGameNotification) on an actor that already
has a save component:
- Open Class Settings and add the JS Save Game Notification implemented interface.
- Add
SaveGame-flagged variables to hold the values (e.g.ProjectileLifetimeas a float,ProjectileVelocityas a vector). - Implement the interface's two events:
- Save Game — copy live state into your variables (read
Get Actor Lifespan, read the projectile movement velocity). - Load Game — push your saved variables back into the live components (Set Lifespan,Set Velocity).
Save Game runs before the save is written, and Load Game runs after your saved values are restored. That makes Load Game the place to re-resolve object references from saved identifiers: look up the actor or asset whose name, class, or GUID you persisted, since the reference itself cannot be saved. These hooks run once per save and load rather than every tick.
A related marker interface, IJSSaveGamePreRegistration, adds a PreSaveGameRegistration event:
your last chance to initialize an object before a load may overwrite it (see the appendix).
4.7 Persistent Destruction
If the player destroys a placed actor, that destruction should also persist so that reloading
does not bring it back. This is governed by ActorDestroyBehavior (an
EJSActorDestroyBehavior) on the save component, which decides what happens when the actor's
EndPlay fires with reason Destroy:
| Value | Meaning |
|---|---|
| PreventRespawn (default) | Delete the actor's save data; a level actor will not respawn on reload. |
| SaveActor | Save the actor instead of removing it — a good choice for a player-controlled pawn. |
| DoNothing | Ignore the destroy: neither save nor prevent reload. |
For example, if a projectile's On Hit destroys the box it strikes, and the box's component
defaults to PreventRespawn, the destroyed box stays gone after a reload. Adding a plain
JS Save Game Component to a pickup is enough to get this despawn-on-destroy behavior.
4.8 Profiles, Slots & Autosave for Shipping
Prototyping uses a single debug slot, but a shipping game needs profiles, multiple save slots, autosave, and quick save. That's the job of the Manager and Helper, wired in through Project Settings.
Customize the Manager. Create a Blueprint subclass of UJSSaveGameManager and assign
it under Project Settings → Jesus Saves → Save Game Manager Class. The manager decides
how many profiles and how many saves per profile exist:
| Property | Meaning |
|---|---|
MaxProfiles |
Maximum number of profiles. |
MaxSavesPerProfile |
Maximum regular save slots per profile. |
MaxAutoSavesPerProfile |
Maximum autosave slots per profile (default 3). |
MaximumSaveGamePolicy |
When full: DeleteOldest or Fail. |
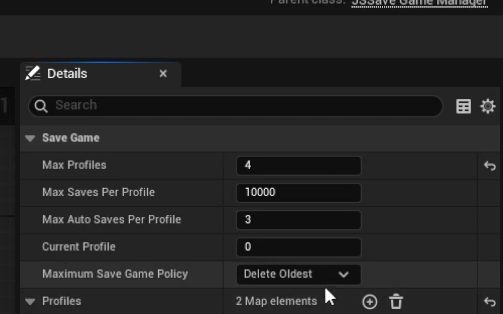
Two ways to model slots. For a fixed-slot game (e.g. 4 named slots) you can pre-allocate profiles and treat each as a slot. For a named-profiles game, call
AddProfile(name)on the manager and iterate theProfilesmap to populate a "select profile" menu. The manager also exposesGenerateNextSlotForProfile,AddProfileSlotData,GetMostRecentSaveSlot,DoesProfileHaveSaveGames,RenameProfile, and more.Never set a maximum to
1— with a single slot the old save is deleted before the new one finishes, risking loss on a crash.
Use the Helper for quick save / autosave. AJSSaveGameHelper is an actor spawned once
per world (it's created for you by the World Proxy) that holds the manager and performs the
saving:
- Autosave — on by default, running every
AutoSaveSeconds(default 900 = 15 minutes). Disable it by clearingbAutoSaveEnabled, or stop it per profile by settingMaxAutoSavesPerProfileto0on the manager. - Quick save / load — call
TriggerQuickSave/TriggerQuickLoad. - Menu flow —
ContinueFromProfile(ProfileKey)loads the most recent save in a profile;StartNewGameFromEmptyProfile(ProfileKey)begins a new game in an empty profile. SaveGameDelaylets you give the player advance notice (e.g. a "Saving…" indicator) before the write happens.
Customize it by subclassing. Like the Manager, the Helper is a Blueprint class. To change a default such as the autosave interval, create a Blueprint subclass, set the value on it, and assign it under Project Settings → Jesus Saves → Save Game Helper Class. The same subclass is where you override the Helper's events (see Multiplayer, below).
To reach the helper from Blueprint, call Get Save Game Helper from
UJSSaveGameFunctionLibrary, check the result is valid, then call the trigger you want.
Important distinction: the debug key in Section 4.2 saves directly through the subsystem for fast iteration. For real gameplay, the quick save players use should go through the Helper's
TriggerQuickSave, so it is tracked as a proper slot in the active profile.
Multiplayer
The Helper performs its work on the authority (server or standalone); clients never save or autosave on their own. Two points for networked games:
- Autosave is server-side. The autosave timer runs only on the authority, so clients never trigger saves. If two Helpers end up in the same process (for example PIE running multiple worlds), autosave is switched off automatically to avoid double-saving.
- Telling clients a save is happening. So clients can show a "Saving…" indicator, the Helper
can broadcast the start and end of a save.
bSendSaveGameEventToClients(on by default) sends theSaveGameStartedandSaveGameFinishedevents to every client through a reliable multicast; switch it off to keep those events server-only. Both events are empty until you override them in your Helper subclass — that is where you show and hide the indicator.
The same function library is your general entry point. It also provides
GetSaveGameManager, GetSaveGameSubsystem, GetSaveGame, GetAllSaveGameSlotNames, and
GetSaveSlotCreationTime for building menus.
4.9 Building the Continue / Save / Load Menus
Menus are ordinary UMG widgets that drive the save system through three objects, each obtained
from UJSSaveGameFunctionLibrary. Get them once and null-check the result before use:
Get Save Game Helper→AJSSaveGameHelper— performs saves and the "continue" load.Get Save Game Manager→UJSSaveGameManager— profile and slot data for building lists.Get Save Game Subsystem→UJSSaveGameSubsystem— loads a specific chosen slot.
Continue — One-Click Resume
For a main-menu Continue button that resumes the most recent save:
- Decide whether to show it. Get Save Game Manager →
DoesAnyProfileHaveSaveGames(orDoesProfileHaveSaveGames(ProfileKey)for one profile). If it returns false, disable or hide the button — there is nothing to continue. - On click. Get Save Game Helper →
ContinueFromProfile(ProfileKey). That single call switches to the profile if needed, loads its most recent save, and travels to the saved level. For a single-profile game pass the manager'sCurrentProfile.
Load — Browse and Pick a Save
For a list the player chooses from:
- Build the list. Get Save Game Manager → read
Profiles(a map ofProfileKey → FJSSaveGameProfile). For the profile you're showing, iterate itsSlotsarray. EachFJSSaveGameSlotgives you what you need for a row: -UserSlotDescription— the label to display (the text you passed when saving), -SlotTime— when it was made (sort by this for most-recent-first), -SaveGameType— SaveGame / QuickSave / AutoSave (filter or icon by this), -SlotName— the id you pass to load it. - On selecting a row. Get Save Game Subsystem →
LoadGame(SlotName, TravelMode)with the selected slot'sSlotName. The subsystem loads the save and travels to its level. UseEJSSaveGameTravel::Seamlessunless you need a hard level transition.
In a multi-profile game, also set the manager's
CurrentProfileto the loaded slot's profile (or load throughContinueFromProfile) so later in-game saves land in the right profile.
Save — Create a Save From In-Game
Saving happens while a level is loaded, usually from a pause menu:
- Build a label (optional). Let the player type a name, or compose one such as
"
<Level> – <time>". - On click. Get Save Game Helper →
TriggerRegularSave(UserDescription). This creates the next slot in the current profile, writes the save, and records the slot with your description so it appears in the Load menu. For a quick save, callTriggerQuickSave.
Route saving through the Helper rather than the subsystem directly. The Helper registers the
save as a profile slot with a description, applies the SaveGameDelay, and fires the save
notifications.
New Game and Profiles (Optional)
- New game: Get Save Game Helper →
StartNewGameFromEmptyProfile(ProfileKey)(the profile must exist and contain no saves). For a single-slot prototype, call the subsystem'sNewGameand open your starting level yourself instead. - Named profiles: Get Save Game Manager →
AddProfile(Name)returns a newProfileKey(0means it failed);RenameProfile(ProfileKey, Name)renames one. IterateProfilesto list them, showing eachProfileNameand most recentSlotTime.
Multiplayer. The
Get Save Game Helper,Get Save Game Manager, andGet Save Game Subsystemlibrary functions are authority-only — on a machine running as a client (connected to a remote server) they return null. This is correct: a client doesn't reach across and drive the server's save system.There is one transition case to handle, though: a client that wants to load its own local save game and leave the remote session. Because
Get Save Game Subsystemreturns null there, a load triggered from inside an active client session must reach the subsystem a different way — use Unreal's built-in "JS Save Game Subsystem" node (it's a Game Instance subsystem, so it exists on every machine, client included) and callLoad Gameon that node instead of the authority-centricGet Save Game Subsystemfunction.The same node also gives you the manager without
Get Save Game Manager: read itsSave Game Managerproperty directly (it likewise exposes the currentSave Game Object). Use those properties when you need slot or profile data from a client session. The save and profile write actions stay on the host/listen server, which is the authority.
Class Reference Appendix
These classes aren't needed for the basic walkthrough but round out the framework.
UJSUniqueIdentifierComponent
Gives an actor a UniqueIdentifier property that is stable for actors placed in a level and
unique for actors spawned at runtime. Every save component already derives from it, so you
rarely add it directly; use WasLoaded() to tell whether an actor was placed in the level
versus spawned.
AJSSaveGameCheckpoint
A ready-made overlap-triggered checkpoint actor: when a player-controlled pawn enters its
trigger box, it saves the game. Place it in the level and set:
- CheckpointDisplayName — a label stored with the save (show it in your UI).
- RetriggerDelay — seconds before it can fire again (default 15).
Override the OnPlayerOverlap / Triggered events for custom behavior. This is the
no-Blueprint-wiring alternative to the manual save key from Section 4.2.
AJSPlayerController / AJSPlayerState
Convenience subclasses that already have a UJSSaveGameComponent attached. They are
optional and not required — adding the component to your own PlayerController/PlayerState is
equally valid. Use them only as a quick starting point.
UJSSaveGameWorldProxy
A user-extensible load/save hook that runs once per level; you are meant to subclass it.
Create a Blueprint subclass, assign it under Project Settings → Jesus Saves → Save Game World
Proxy Class, and override its events. Each level has its own per-level GUID property that
uniquely identifies the level (.umap); by default the proxy respawns the dynamic actors that
were saved in that level. With your own subclass you can:
- Stop saved actors from respawning. Set
bRespawnActorsto false when your game recreates dynamic actors itself (an NPC spawner or director, for instance), so the save system doesn't bring them back a second time and double them up. The pending respawn list,ActorSpawns, is also exposed, so you can filter it (drop NPC classes but keep loot or physics props) instead of disabling respawning entirely. - Smooth out loading.
RespawnBudget(0.001–0.05 s, default 0.004) is how much time each frame is spent respawning saved actors. Raise it to finish sooner, lower it to spread the work over more frames and avoid hitches on large saves. Hold gameplay until it finishes withAreSaveGameActorsStillSpawning(function library) — for example from your GameMode'sReadyToStartMatch. - Control which level a save is associated with. Override
Make Level Guid— for example give a procedurally generated level a stable identity so its actors reload correctly, or associate several maps together (or split one apart). - Delay a level transition. Override
Allow World Traveland return false to postpone a save-game travel until you're ready (a cutscene ends, streaming completes, a "saving…" prompt is shown), then return true. - Run per-level logic. Override
On World Begin Play,Post Initialize, orTick(controlled byIs Tickable/Is Tickable When Paused/Is Tickable In Editor) to run your own save-related logic at the world level without adding a separate manager actor. - Spawn actors into the save system. Call
Spawn Actor With Unique Identifierto create an actor already linked to a saved identity, so its save component restores the right data — useful when you reconstruct certain actors with custom logic but still want them persisted.
UJSSaveGameWorldSubsystem
An internal per-world driver — you don't interact with it directly; put custom load-time logic in a World Proxy subclass (above).
UJSSerializationFunctionLibrary
Lower-level helpers for manual serialization — SerializeStructure /
DeserializeStructure, SerializeSaveGameProperties / DeserializeSaveGameProperties, and
related low-level helpers. Most projects never need these; reach for them only when storing custom
binary blobs yourself.
IJSSaveGamePreRegistration (Interface)
A single event, PreSaveGameRegistration, called just before an object registers with the
save system — which may immediately trigger a load. It's your last chance to initialize state
before a load can overwrite it.
Saving Data That Isn't on an Actor
Not all state lives on an actor — think global progression, unlocked items, or a settings
object. Two options:
- Register a plain UObject. Have your object implement IJSSaveGameNotification and call
RegisterPersistentObject on the subsystem. It then receives Save Game / Load Game
events just like an actor component, and can read/write the active UJSSaveGame. Call
UnregisterPersistentObject before the object goes away.
- Use GameInstanceData. UJSSaveGame carries a GameInstanceData blob for level-independent
state that should travel with the save regardless of which level is loaded.
Troubleshooting & Tips
- Reload does nothing → confirm you save and load with the same slot name.
- A variable won't persist → make sure it has the
SaveGameflag (Details → Advanced → Save Game). Unflagged variables are never saved. - An object/actor reference won't save → object references can't be serialized, even when
flagged. Save an identifier (a
FName,TSubclassOf, or GUID) instead and re-resolve the object in the Load Game event. Watch the log for "Can't save object property … marked with Save Game." - A custom struct saves nothing → mark its members with
SaveGametoo; a struct with no saved members is skipped. - Player duplicated on load → enable
bDoNotAutomaticallyRespawnon the player's component. - Multiplayer pawn loses its load → set a small
LoadGameDelay(e.g.0.03). - Project Settings changes don't apply → the Jesus Saves default-class settings are restart-required; restart the editor.
- Quick save not tracked in the menu → use the Helper's
TriggerQuickSave, not a direct subsystem save. - Slots fail to resolve a user → ensure OnlineSubsystem and OnlineSubsystemUtils are enabled.
All 17 Classes at a Glance
| Class | Role | Covered in |
|---|---|---|
UJSDeveloperSettings |
Project Settings: swap in your subclasses | §4.1 |
UJSSaveGame |
The save data container (+ save/load events) | §4.1 |
UJSSaveGameSubsystem |
Performs save and load (works on its own) | §4.2 |
UJSSaveGameComponentBase |
Abstract base for custom components | §4.4 |
UJSSaveGameComponent |
Saves SaveGame properties + despawn |
§4.4 |
UJSLevelActorSaveGameComponent |
Adds transform / flags / control rotation | §4.3 |
UJSPhysicsActorSaveGameComponent |
Adds linear & angular velocity | §4.5 |
UJSSaveGameManager |
Profiles & slots bookkeeping | §4.8 |
AJSSaveGameHelper |
Autosave, quick save, profile flow | §4.8 |
UJSSaveGameFunctionLibrary |
Blueprint entry points (Get… helpers) | §4.2, §4.8 |
UJSSaveGameWorldProxy |
Extensible per-level hook: respawn control, level id, travel control | appendix |
UJSUniqueIdentifierComponent |
Stable/unique actor identity | appendix |
AJSSaveGameCheckpoint |
Overlap-triggered checkpoint actor | appendix |
AJSPlayerController |
Convenience controller w/ component | appendix |
AJSPlayerState |
Convenience player state w/ component | appendix |
UJSSaveGameWorldSubsystem |
Per-world driver for the proxy | appendix |
UJSSerializationFunctionLibrary |
Manual serialization helpers | appendix |
Interfaces: IJSSaveGameNotification (§4.6) · IJSSaveGamePreRegistration (appendix).
Full API documentation: https://jesussaves.stevenchristy.workers.dev/